Monday, 31 August 2020

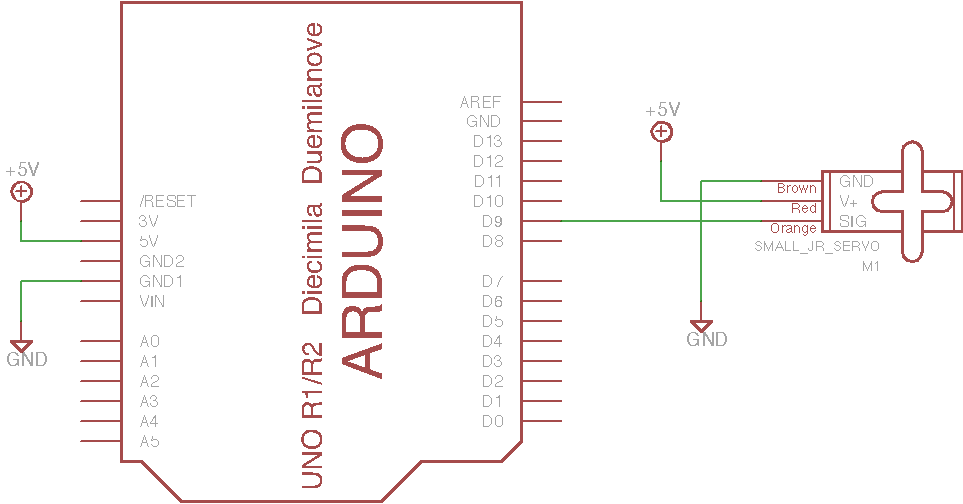
EAGLE Circuit

Hobby Servo:  

Hobby servos - feedback-controlled motors which move an output shaft to a specified position. Internally they use a potentiometer to measure actual position. The internal circuit compares the actual and commanded position and generates positive and negative motor current pulses to operate a tiny gearmotor. Modular controlled physical motion.
PWM dictates duration approximately 1-2 ms repeated at approximately 50 Hz. 

EAGLE Schematic: 

Exercise: Servo Sweep — Intro to Arduino

Motors, Servos, Capacitive Touch

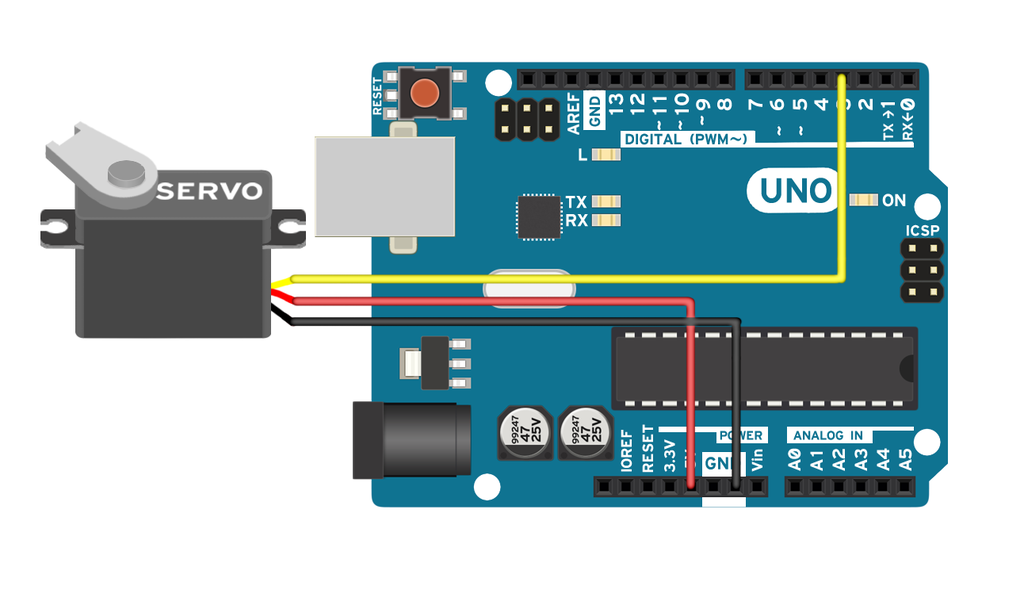
Servo: 

1x Arduino Uno 
3x Jumpers
1x Servo Motor
How to Connect Them

Code:


#include <Servo.h> 


int servoPin = 3; 

Servo Servo1; 

void setup() { 

   Servo1.attach(servoPin); 

}

void loop(){ 

   Servo1.write(0); 

   delay(1000); 

   Servo1.write(90); 

   delay(1000); 

   Servo1.write(180); 

   delay(1000); 

}


MPR121 12-Key Capacitive Touch Sensor:

1x Arduino 
2x Jumper 
1x Touch Sensor
Touch aszd5vxmjb
Code: 
void setup() {
 pinMode(2, INPUT);
 Serial.begin(9600);
}
void loop() {
 if (digitalRead(2) == HIGH)Serial.println("Sensor is touched");
 delay(500);
}
Stepper Motor:

1x Arduino Uno board

1x Stepper Motor

1x Stepper Driver

2x Resistor

9x Jumpers


Code:

#include <Stepper.h> //including stepper motor library

int stepIN1Pin = 8;         

int stepIN2Pin = 9;

int stepIN3Pin = 10;

int stepIN4Pin = 11;

int stepsPerRevolution = 2048; // amount of steps per revolution


const int button1Pin = 2;  // pushbutton 1 pin for clockwise rotation

const int button2Pin = 3;  // pushbutton 2 pin for counter clockwise rotation


Stepper myStepper(stepsPerRevolution, stepIN1Pin, stepIN3Pin, stepIN2Pin, stepIN4Pin);


void setup() {


  pinMode(button1Pin, INPUT);

  pinMode(button2Pin, INPUT);

myStepper.setSpeed(15);

}


void loop() {


int button1State, button2State;

  button1State = digitalRead(button1Pin);

  button2State = digitalRead(button2Pin);

 if (((button1State == LOW) && !(button2State == LOW)))  // if we're pushing button 1 OR button 2

  myStepper.step(stepsPerRevolution/8);

  if (((button2State == LOW) && !(button1State == LOW)))  // if we're pushing button 1 OR button 2

  myStepper.step(-stepsPerRevolution/8);

  }


PWN and Transistors

W3: PWN and Transistors. Fades, Voltage Dividers:

Fades:

  • 1x Arduino or Genuino board
  • 1x LED
  • 1x Resistor 
  • 6x Jumpers
  • 1x Perfboard

Code: 

int led = 9;           // the PWM pin the LED is attached to
int brightness = 0;    // how bright the LED is
int fadeAmount = 5;    // how many points to fade the LED by

  pinMode(led, OUTPUT);
}


void loop() {

  analogWrite(led, brightness);


  brightness = brightness + fadeAmount;


  if (brightness <= 0 || brightness >= 255) {
    fadeAmount = -fadeAmount;
  }
 
  delay(30);
}

Resistors, Serial Communication

 W2: Resistors, Serial Communication

Potentiometer:


A potentiometer is a knob that provides a variable resistance as an analog value. The value controls the rate at which an LED blinks.


1x Arduino Uno 

1x Breadboard

4x Jumpers 

1x Potentiometer 

1x Resistor

1x LED 


int potPin = 2;    // select the input pin for the potentiometer

int ledPin = 13;   // select the pin for the LED

int val = 0;       // variable to store the value coming from the sensor


void setup() {

  pinMode(ledPin, OUTPUT);  // declare the ledPin as an OUTPUT

}


void loop() {

  val = analogRead(potPin);    // read the value from the sensor

  digitalWrite(ledPin, HIGH);  // turn the ledPin on

  delay(val);                  // stop the program for some time

  digitalWrite(ledPin, LOW);   // turn the ledPin off

  delay(val);                  // stop the program for some time

}


Light Depedent Resistors:

Overview | Photocells | Adafruit Learning System

Photocells are light-sensitive, variable resistors. As more light shines of the sensor’s head, the resistance between its two terminals decreases. Used in ambient-light sensing. 


In pitch-black conditions, the photocell’s resistance will be in the megaohm’s (1.0MΩ+) range. Shining an LED on the sensor can drop the resistance to near-zero, but usually the resistance of the photocell falls between 8-20kΩ in normal lighting conditions.

By combining the photocell with a static resistor to create a voltage divider, you can produce a variable voltage that can be read by a microcontroller's analog-to-digital converter.


Photocell that switches on an LED in darkness and turns it off when exposed to light:

1x Arduino Uno
1x Breadboard
1x Photocell
2x Resistors
1x LED
7x Jumpers
Light sensor led on off e1dkb7cgjl
Code: const int sensorPin = 0; const int ledPin = 9; int lightCal; int lightVal;
void setup() { pinMode(ledPin, OUTPUT); lightCal = analogRead(sensorPin); } void loop() { lightVal = analogRead(sensorPin); if (lightVal < lightCal - 50) { digitalWrite(ledPin, HIGH); } else { digitalWrite (ledPin, LOW) } }
TMP36 Temperature Sensor:
5V Arduino - connecting directly to Analog pin:

"Voltage at pin in milliVolts = (reading from ADC) * (5000/1024) 
This formula converts the number 0-1023 from the ADC into 0-5000mV (= 5V)

3.3V Arduino:

Voltage at pin in milliVolts = (reading from ADC) * (3300/1024) 
This formula converts the number 0-1023 from the ADC into 0-3300mV (= 3.3V)

Convert millivolts into temperature:

Centigrade temperature = [(analog voltage in mV) - 500] / 10" - https://learn.adafruit.com/tmp36-temperature-sensor/using-a-temp-sensor

temperature_sensorwiring.gifCode: int sensorPin = 0; void setup() { Serial.begin(9600); } void loop() { int reading = analogRead(sensorPin); float voltage = reading * 5.0; voltage /= 1024.0; Serial.print(voltage); Serial.println(" volts"); float temperatureC = (voltage - 0.5) * 100 ; Serial.print(temperatureC); Serial.println(" degrees C"); float temperatureF = (temperatureC * 9.0 / 5.0) + 32.0; Serial.print(temperatureF); Serial.println(" degrees F"); delay(1000); }
Basics

"Hello World" Code:

void setup() {                
pinMode(13, OUTPUT); //setup pin 13 as an output
}

void loop() {
digitalWrite(13, HIGH); // turn the LED on (HIGH outputs 5V)
delay(500); // wait for 500 milliseconds
digitalWrite(13, LOW); // turn the LED off (LOW outputs 0V)
delay(500); // wait for 500 milliseconds
}
Simon Says Circuit:

5x pushbuttons

1x Blue led

1x Yellow led

1x Red led

1x Green Led

4x 1k resistors

4x 10k resistors

10x jumpers

1x Arduino Uno 


When the button attached to A4 pin is pressed a sequence is generated and the software wait for the same sequence. If the two sequence are different the LEDs will blink for three times very fast otherwise the sequence is correct. If the sequence is correct the game goes ahead and the difficulty and velocity are incremented.

The two sequence are stored in two vectors and compared.


Code: 


const int MAX_LEVEL = 100;

int sequence[MAX_LEVEL];

int your_sequence[MAX_LEVEL];

int level = 1;


int velocity = 1000;


void setup() {

pinMode(A0, INPUT);

pinMode(A1, INPUT);

pinMode(A2, INPUT);

pinMode(A3, INPUT);


pinMode(2, OUTPUT);

pinMode(3, OUTPUT);

pinMode(4, OUTPUT);

pinMode(5, OUTPUT);


digitalWrite(2, LOW);

digitalWrite(3, LOW);

digitalWrite(4, LOW);

digitalWrite(5, LOW);

}


void loop()

{

if (level == 1)

generate_sequence();//generate a sequence;


if (digitalRead(A4) == LOW || level != 1) //If start button is pressed or you're winning

{

show_sequence();    //show the sequence

get_sequence();     //wait for your sequence

}

}


void show_sequence()

{

digitalWrite(2, LOW);

digitalWrite(3, LOW);

digitalWrite(4, LOW);

digitalWrite(5, LOW);


for (int i = 0; i < level; i++)

{

digitalWrite(sequence[i], HIGH);

delay(velocity);

digitalWrite(sequence[i], LOW);

delay(200);

}

}


void get_sequence()

{

int flag = 0; //this flag indicates if the sequence is correct


for (int i = 0; i < level; i++)

{

flag = 0;

while(flag == 0)

{

if (digitalRead(A0) == LOW)

{

digitalWrite(5, HIGH);

your_sequence[i] = 5;

flag = 1;

delay(200);

if (your_sequence[i] != sequence[i])

{

wrong_sequence();

return;

}

digitalWrite(5, LOW);

}


if (digitalRead(A1) == LOW)

{

digitalWrite(4, HIGH);

your_sequence[i] = 4;

flag = 1;

delay(200);

if (your_sequence[i] != sequence[i])

{

wrong_sequence();

return;

}

digitalWrite(4, LOW);

}


if (digitalRead(A2) == LOW)

{

digitalWrite(3, HIGH);

your_sequence[i] = 3;

flag = 1;

delay(200);

if (your_sequence[i] != sequence[i])

{

wrong_sequence();

return;

}

digitalWrite(3, LOW);

}


if (digitalRead(A3) == LOW)

{

digitalWrite(2, HIGH);

your_sequence[i] = 2;

flag = 1;

delay(200);

if (your_sequence[i] != sequence[i])

{

wrong_sequence();

return;

}

digitalWrite(2, LOW);

}


}

}

right_sequence();

}


void generate_sequence()

{

randomSeed(millis()); //in this way is really random!!!


for (int i = 0; i < MAX_LEVEL; i++)

{

sequence[i] = random(2,6);

}

}

void wrong_sequence()

{

for (int i = 0; i < 3; i++)

{

digitalWrite(2, HIGH);

digitalWrite(3, HIGH);

digitalWrite(4, HIGH);

digitalWrite(5, HIGH);

delay(250);

digitalWrite(2, LOW);

digitalWrite(3, LOW);

digitalWrite(4, LOW);

digitalWrite(5, LOW);

delay(250);

}

level = 1;

velocity = 1000;

}


void right_sequence()

{

digitalWrite(2, LOW);

digitalWrite(3, LOW);

digitalWrite(4, LOW);

digitalWrite(5, LOW);

delay(250);


digitalWrite(2, HIGH);

digitalWrite(3, HIGH);

digitalWrite(4, HIGH);

digitalWrite(5, HIGH);

delay(500);

digitalWrite(2, LOW);

digitalWrite(3, LOW);

digitalWrite(4, LOW);

digitalWrite(5, LOW);

delay(500);


if (level < MAX_LEVEL);

level++;


velocity -= 50; //increase difficulty

}